|
Online Patternmaking Classes
by Don McCunn Bust Sling Home Page ► Week Three ► Go To Week Four Bra Design VariationsIn this week we will look at several different ways of styling the basic Bust Sling pattern into different types of bras. The instructions for the Basic Bra show the steps for creating all these bras. These basic steps are not repeated in the instructions for the other bras. Step-by-step written instructions are available in the book How to Make Custom-Fit Bras & Lingerie. Specific page references are included for each style. Each bra variation has details that can be used in the other styles to create different designs. I have indicated the "universal" techniques below. Contents
One variation you may want to consider for any bra pattern is to change the Styling Cup from using a dart to a seam. The dart provides the easiest means of determining the initial fit. However, the point of the dart is not as subtle as when you change the shaping to a seam as you can see in the photo below of two poster board Styling Cups.  The Styling Cup with the dart is shown on the left. The version on the right has been changed to a Princess Seam. The procedure for changing a Styling Cup into a seam is shown in the video below and in the book on pages 78 and 79. Creating a Styling Cup with a Seam (5:53 minutes) Basic Bra These videos show the complete steps for creating a basic Bust Sling Bra after the fabric has been cut from the initial pattern. For step-by-step written instructions, see pages 75 to 77 in the book. This particular version is a front opening, "X" back, with sliders on the rib cage elastic to allow for adjusting the tension. The "X" Back strap provides support for the front of the bra starting at the shoulder seam and crossing the back to meet the elastic around the rib cage. To provide optimum support for the front, the strap in back should be as close to the side of the body as possible. The "X" Back Strap (4:58 minutes) The procedure for sewing the body of the Bust Sling Band is the same as that used for the trial muslin Bust Sling described in Week Two. Sew the Styling Cup (3:34 minutes) Sew the Body of the Bust Sling (4:39 minutes) The final steps to finish this bra are to prepare the back elastic casing then add the rib cage elastic. Finish the Back Elastic Casing (4:12 minutes) Finish the Bra (6:12 minutes) Racerback The Racerback styling offers an optimum amount of support across a wide portion of the back. The pattern for the Racerback can be created by either draping muslin across the back or by using an Upper Torso Sloper pattern for the back. The videos show the process of draping the pattern using DIY techniques. The third video compares the resulting pattern to an Upper Torso pattern so you can see how to modify your own Upper Torso pattern. For step-by-step written instructions, see pages 84 to 86 in the book. Drape the Racerback, DIY (3:16 minutes) Adjust the Muslin Shape (4:39 minutes) The Paper Pattern (5:19 minutes) The sewing instructions start after the fronts for the Bust Slings have been created in the usual manner up to the point the elastic is to be added. These instructions include a front opening closure. Before you start to sew, create a pattern for the elastic under the Bust Sling front. If you are creating a Racerback neckline that has a "V" shape in the back, create a pattern for a reinforcement for this area. Prepare the Front (3:28 minutes) Sew the Front to the Back (4:08 minutes) Sew the Neckline (6:05 minutes) Sew the Rib Cage (5:52 minutes) Zipper Opening Bra These instructions illustrate how to add a bridge to center front to keep the Bust Sling Bands close to center front thus countering any undesired East/West drift. To create the bridge pattern, use muslin to determine the shape as described in the second fitting during Week Two. If you have a pattern for a conventional bra, you can use that as a bridge pattern. For this example a zipper is used with the bridge to create a front opening bra. It is a halter style bra. These instructions start after the body of the Bust Slings has been created in the usual manner. For step-by-step written instructions, see page 87 in the book. Create the Bridge (5:52 minutes) Finishing the Zipper Bra (5:15 minutes) Nursing Bra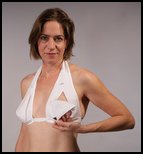 The open cup Bust Sling Band is a natural shape for a Nursing Bra. The only addition that needs to be made is an expanded Nursing Cup to cover the opening. For this example the top of the Nursing Cup is fastened to the Bust Sling Band using a wide waistband hook and eye. In this example I show the edges finished with fold over elastic. This bra needs a pattern for the Nursing Cup that will make it larger than the area of the Styling Cup. In this example, the princess seam Styling Cup is used. For step-by-step written instructions, see pages 88 and 89 in the book. Nursing Cup Pattern (4:36 minutes) If you are using fold-over elastic, remove the seam allowances from the outside edges of the pattern. Sew the Inside of the Band (5:37 minutes) Sew the Outside of the Band (5:17 minutes) Sew the Nursing Cup (4:18 minutes) Finish the Bra (4:59 minutes) Hybrid Bra The Hybrid Bra combines the support of the Bust Sling Bra with the full band of a conventional bra. The conventional bra band controls the position of the Bust Sling up to the full bust level and supports any fluff on the side of the body under the arm. The support from the Bust Sling eliminates the need for an underwire. This example uses the bra findings of a conventional bra including plush back elastic at the rib cage, plush back elastic or neckline edging around the Bust Sling Band, and a hook and eye bra back closing. It does not use bra strap elastic, sliders, underwires, or underwire channeling. This bra requires the full band pattern of a conventional bra which includes a bridge and back band as show below. In this illustration there is a dotted line at the vertical Bust Apex line and Center Front. 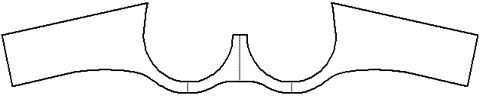 If you do not have a custom-fit pattern as I describe how to create in my How to Make Custom-Fit Bras & Lingerie, you can create the shape for the back band while you are doing the initial mold as describe in Week One. You will need a bridge pattern as described in the video for the second fitting during Week Two. Another alternative would be to take a conventional bra that is no longer wearable and cut out the cups, then trace the shapes onto pattern paper. Be sure to stretch the band to achieve the best possible shaping. I recommend using a cup less bra to verify that the lines of the full band pattern will align with the Bust Sling Bra pattern. The photo below shows a cup less bra that includes the hook and eye back closing, plush elastic on the top and bottom, powernet, underwire channeling, and underwires. The rings and loops for removable bra straps proved unnecessary.  The instructions below start after the Bust Sling has been sewn following the usual steps. Sewing the Band to the Bust Sling (5:57 minutes) Finishing the Edges (3:45 minutes) Adding a Closure (3:37 minutes) Bust Sling Home Page ► Week Three ► Go To Week Four
Copyright © 2007, & 2020 by Donald H. McCunn
|